These Vintage-Inspired, Felt Christmas Ornaments are the perfect cozy-evening-in craft!
They would also make a perfect gift (potentially a future family heirloom?). Inspired by vintage ornament shapes, but modernized with a fresh color palette, these hand crafted ornaments will never look dated.
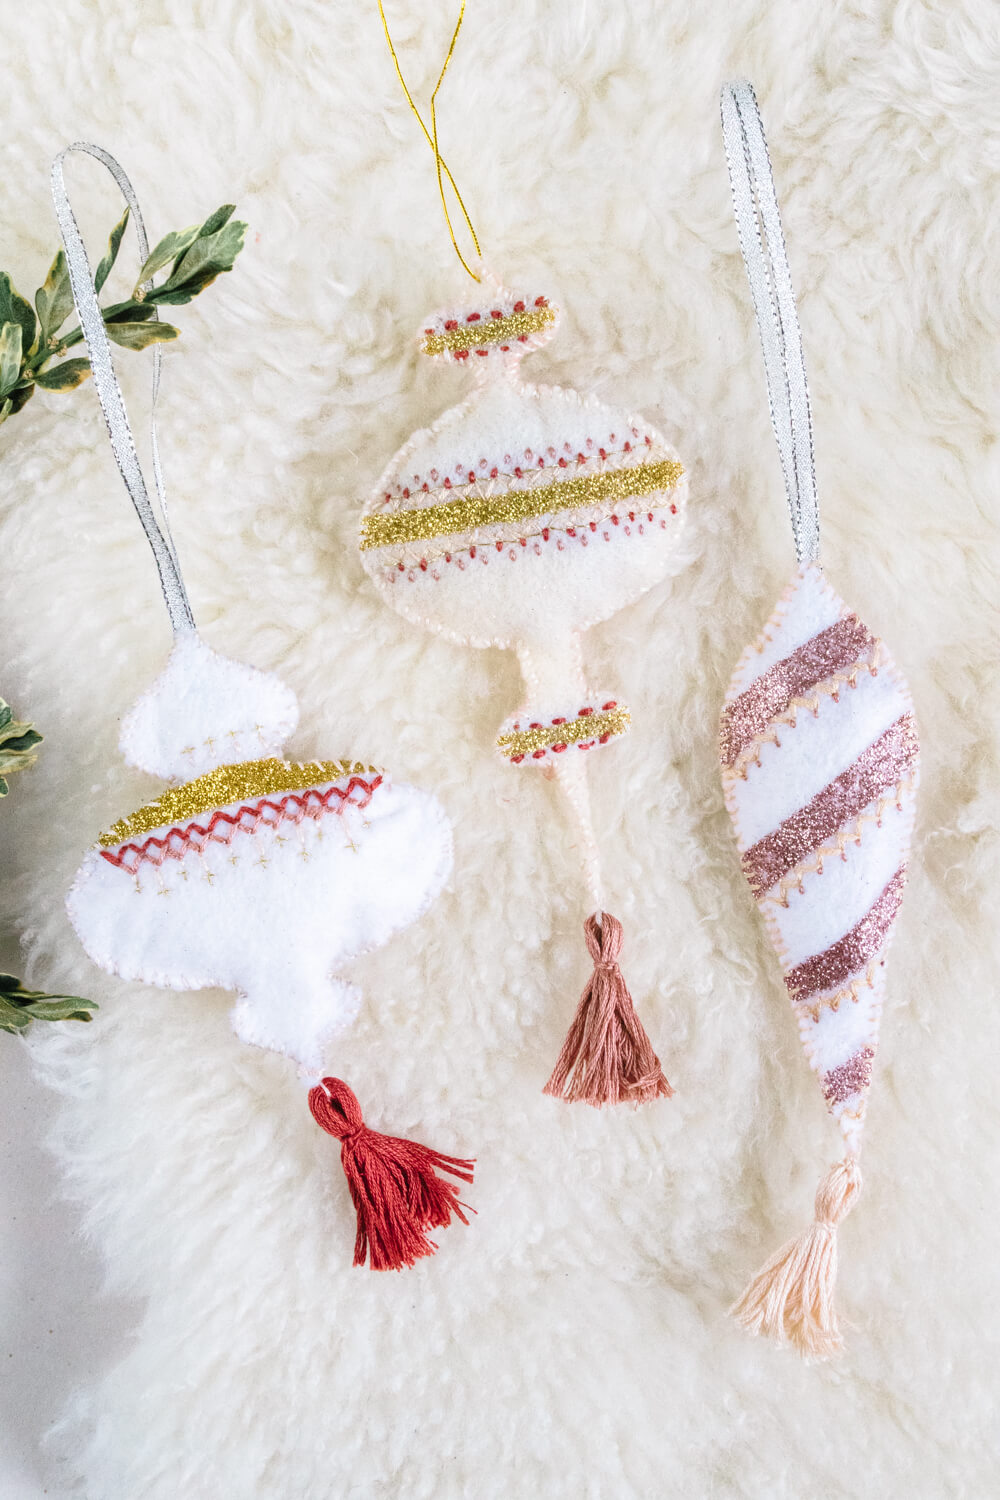
Continue reading to learn step-by-step how to make these heirloom quality, vintage-inspired felt Christmas ornaments.

{{ This post contains affiliate links. These links don’t cost you anything extra, but allow me to run this site and provide free content for you. You can read the full disclosure here.}} *As an Amazon Associate I earn from qualifying purchases.
Materials You Will Need
- Felt
- Glitter
- Masking tape or painters tape
- White glue
- Embroidery thread in assorted colours
- Twine or ribbon
- Polyester filling
Get the password below to download this template from the Craft and DIY Resource Library which you can login to here.


Begin by cutting the pattern out from your felt. If you have a Cricut Maker (On sale now for only $299 until 12/18!) you can easily cut out the felt with it. If you don’t have a Cricut, simply cut out the ornament shape you would like to make, place it on top of your felt and trace around the pattern using a pen. Then cut the shape out of the felt using sewing shears.
You will need to cut out the shape out twice, one for the front side and one for the backside of your ornament.
Next, using masking or painter’s tape, section off parts of your ornament to create your desired design.

Then apply an even layer of white glue to your felt and cover with a heaping of glitter. While the glue is still wet, carefully remove the tape to reveal your design.
Allow the glue to dry before adding a top coat of glue to seal the glitter in place. Check out this post for my top tips on working with glitter (keeping your workplace clean, sealing tips, etc.).

Tip: I recommend keeping the glitter towards the edges of your ornament shape to a minimum. Don’t cover all edges with glitter. The dried glue does create a fair amount of resistance to your embroidery needle when sewing the front and back together. If this worries you, or if you are helping a child make these, I’d suggest leaving around a 1/8th of an inch margin of bare felt around the entirety of the ornament.
Preparing to Embroider Your Felt Christmas Ornament
Cut a piece of embroidery thread about four times the distance you’d like to embroider.
Take your embroidery thread and tie a knot at one end, leaving about a half-inch tail to the knotted end.
Thread a needle onto the other side of the embroidery thread.


Embroidering a Basic Zig-Zag
To begin your embroidery design, push your needle from the backside of your ornament (the side with no glitter) towards the front side, about an eighth of an inch from the edge. Pull your needle out from the front side until the knotted end is snug against the backside.
Then stitch into the front side, making about a 45-degree angle. Again, push the needle through to the back until your first stitch is snug.

As pictured above, continue this stitch across your felt Christmas ornament.


Once you reach the opposite end, repeat the same process backwards, this time using the previous stitches to guide your new stitches. Once you meet up where you began, end the zig-zag embroidery with a knot on the backside of the ornament.


I decided to repeat this zig-zag design underneath with a different color of embroidery thread, creating an ombre affect.


Next, I did a simple stitch going straight vertically up and down (pictured above on the right).

Lastly, I created little stars by stitching two overlapping stitches in a cross shape.


Finishing Off Your Hand Embroidered and Sewn Felt Christmas Ornament
Prepare another piece of embroidery thread for sewing (again about four times the distance you’d like to embroider, in this case, the circumference of the ornament).


Place your front piece of felt against your back piece, with the embroidered sides facing outwards. Begin your first stitch from the inside of the sandwiched felt pieces, to hide the end knot. Have your stitches cross over the edges.
Once you’ve reached the top of your ornament, be sure to slide a folded ribbon or twine and stitch through it to secure it.
Continue stitching around your ornament’s edge until you reach about one inch from where you began. Use a pencil to push your polyester filling into the far to reach corners of your ornament. Then finishing your ornament off by stitching up this opening.

To add additional vintage-style embellishment to your ornament, make a tassel from your embroidery thread and sew it onto the bottom of your felt Christmas ornament. You can find my how-to guide for easily making a tassels at the end of this post.
Below are closeup looks at the other designs I did with both glitter and embroidery.


1 thought on “How to Make Vintage-Inspired Felt Christmas Ornaments”
Pingback: 24 More Free Felt Ornament Patterns - The Yellow Birdhouse